Spicy chili

spicy-chili

It’s officially comfort food season! Let the countdown to Thanksgiving begin, and the counting of calories end. It’s time to slip on that oversized sweater and pretend that bread doesn’t make you fat. I’m kicking off the season with a hearty bowl of spicy chili that’s sure to warm your soul.

This was actually my first time making chili. I don’t know how that happened being from Wisconsin, as chili is the glue that holds the Midwest together during the winter, but let’s just not talk about it.

This version is perfect for first timers. I got the recipe from my boyfriend’s mother, but tweaked it slightly by adding some cayenne pepper to spice things up. The ingredients are very basic and not a lot of prep work is involved. It’s a great set it and forget it dish. And the best part is it gets better as it sits, so you can feast on it all week!

The only thing I would be wary of is the brand of tomato products you choose. The only option for me at the time was Hunts, which I find to be a little more sugary than other brands. The chili ended up being a little too sweet for my liking, as the recipe calls for additional sugar—so maybe omit it if you’re working with a sugary tomato product.

Let’s talk fixin’s.

My mentality when it comes to toppings is more is morecheese, sour cream, diced onion, jalapeños, avocado, cilantro, or even some crushed up tortilla chips. However, the chili is delicious on its own, so feel free to keep it classic if that’s more your thing!

Enjoy.

Ingredients

All cans are 14.5-15 ounces,  unless otherwise specified. 

  • 3  cans dark red kidney beans (do not drain)
  • 3 cans stewed tomatoes
  • 2 cans tomato sauce
  • 1 (6 oz) can tomato paste
  • 2 lbs lean ground beef
  • 1 large white onion
  • 1/2 cup packed brown sugar (more or less to taste)
  • 3 tsp cumin
  • 2 tbsp chili powder
  • cayenne pepper (to taste)
  • salt and pepper

Toppings ideas (optional)

  • shredded cheese
  • sour cream (or greek yogurt)
  • jalapeño
  • red onion
  • avocado
  • cilantro
  • tortilla chips

Instructions

Finely dice the onions and sauté them over medium heat in a large pot with the ground beef, until onions are translucent and beef is cooked through. Add all remaining ingredients and mix well. Add salt and pepper to taste.

Let simmer for 30 minutes and adjust any additional seasonings or sugar as needed. Prepare toppings as chili simmers.

*Make the day ahead for best flavor! 


Polenta trout cake with tangy green pepper sauce

polenta-trout-cake

There are two sides when it comes to leftovers. You either cower away from the casserole your mom made three days ago as if green gas is billowing out of it, or you stand in front of the fridge stuffing fork fulls of cold spaghetti in your pie hole. If you land on the latter end of the spectrum, this post is for you.

My brother (and I) happen to be on Team Leftover. He more like runs the team—nothing goes to waste in our house. One time he used leftover garlic bread to make a crust for some sort of German sauerkraut pie that also incorporated leftover pasta. Not to mention he makes bread pudding out of any stale carb under the sun. It’s pretty impressive, actually.

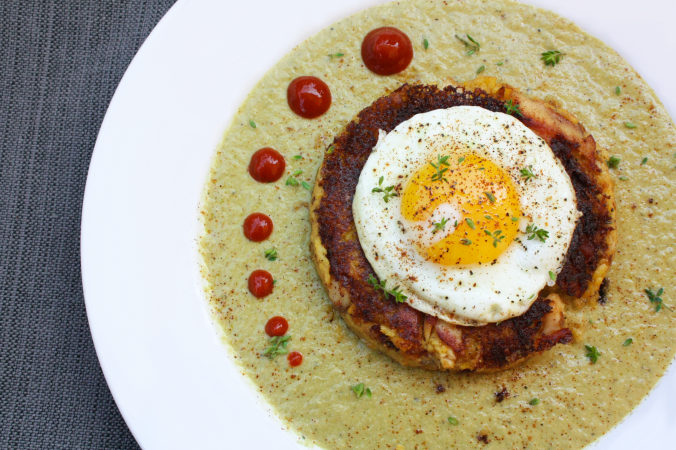
And, y’all know how much I love breakfast, so when Stephen (my bro) came up with a dish to use up our leftover trout and polenta that included eggs, I was down. I know it’s highly unlikely you will have both leftover polenta and trout on hand, so I will let you in on how we made ours in the Instruction section below.

This leftover revamp is out of bounds (and all other Guy Fieri jargon). The cakes are rich from the creamy polenta, with a subtle smokiness from the fish, that pair really well with the tanginess from the mustard in the green pepper sauce. Of course this dish can be made sans egg, but I wouldn’t recommend it because yolk porn. The cakes are pretty hearty and filling, so bring an appetite for this one!

Enjoy.

Ingredients

For the polenta (if you don’t have leftovers)

  • 2 cups whole milk
  • 2 cups chicken stock
  • 4 tbsp unsalted butter
  • 4-6 ounces sharp cheddar cheese, shredded
  • salt and pepper

For the trout (if you don’t have leftovers)

  • wild trout filet, skin on
  • chipotle powder
  • paprika
  • granulated garlic
  • creole seasoning

For the cakes

  • polenta, leftover or made fresh and cooled
  • trout, cooked
  • chipotle powder
  • paprika
  • white pepper
  • butter (for frying)
  • olive oil (for frying)
  • salt and pepper
  • egg (optional)

For the sauce

  • 1/2 large green pepper, sliced
  • 1/4 red onion, sliced
  • 1/4 whole milk
  • 1-2 tbsp butter
  • 1/2-3/4 cup chicken stock (depending on desired consistency)
  • 1 tbsp mustard
  • granulated garlic
  • fresh herbs (basil, mint, thyme or anything you have on hand)
  • olive oil
  • salt and pepper

Instructions

Skip to third paragraph if you already have leftover polenta and trout.

If you need to make polenta, bring milk and stock to a boil. Gradually whisk polenta in and reduce heat to low. Cook for 20-25 mins, stirring every couple of minutes until consistency is thick and creamy. Remove from heat and stir in cheese little by little, until completely melted. Season with salt and pepper to taste.

If you need to make the trout, season fish with chipotle powder, paprika, garlic, and creole seasoning. Drizzle with a little olive oil and grill, skin-side down, on a fairly hot grill until translucent, or just cooked though. DO NOT FLIP. It’s okay if the skin gets a little burnt because it’s acting as a barrier from the direct heat, protecting the meat from charring, while keeping the fish moist.

Once you have polenta and trout, start by making the green pepper sauce. Sauté peppers and onions in olive oil. After a few minutes add butter, milk, mustard, and granulated garlic. Add fresh herbs and season with salt and pepper. When veggies are soft and cooked through, move to blender (or bowl if using immersion blender) and liquify until consistency is similar to whole milk—add more milk if too thick. Return to pan and keep over very low heat until ready to serve.

Take leftover polenta and break it apart so it’s more pliable. Break up trout into good size chunks and add to polenta. Season mixture with white pepper, chipotle, paprika, and salt and pepper. Heat olive oil and butter over medium heat until butter turns toasty brown. Form polenta/trout mixture into patties the size of a thick burger. Fry patties until brown and crusty on each side. While patties are frying, cook eggs as desired in a separate pan.

Plate patties with (or without) an egg and the green pepper sauce. Serve with a side of mixed greens lightly dressed with olive oil and vinegar.

Southwestern shrimp salad

sw-shrimp-salad-2

When I was growing up, my mom would make this bean salad called Texas caviar. It had all the usual suspects of Tex-Mex cuisine—corn, bell pepper, onion, tomato, etc. We would eat it with Fritos Scoops by the vat (or so it felt). It was an awesome summertime eat because it didn’t require a heat source to make. Midwest summers don’t mix well with the oven. Or the stove. Or even a toaster. Ninety-degree days with 90% humidity and no air conditioner? No thanks, I’ll eat my Eggo frozen.

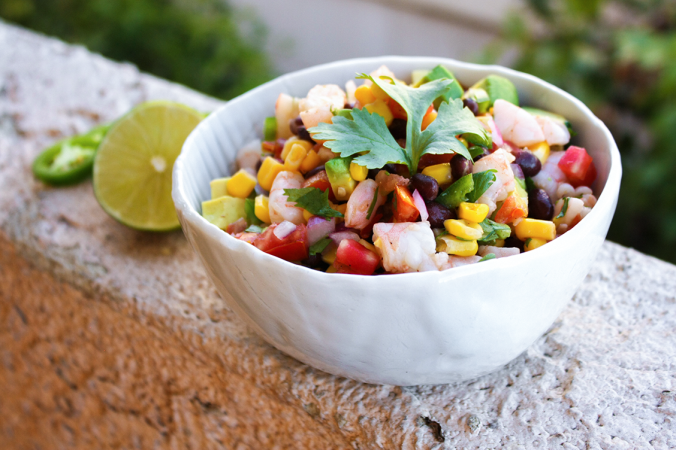
Here, I have made a slightly sexier version of my mom’s Texas caviar. I should probably call if California caviar because if living in LA has taught me anything, it’s that adding avocado to something makes it “Californian.”  But, I won’t do that to you guys.  

This salad is hearty, fresh, and light. You can eat it by itself, over greens, or my personal fav—with tortilla chips. The lime and cilantro lend a brightness that really wakes up the shrimp and cuts through the richness of the avocado. The black beans give it some substance, so it’s easy to fill up on. I like to keep my knife cuts rough and rustic and the best part about making this dish is that the measurements don’t need to be precise. Add as many or as little of the ingredients as you like. You can also eliminate anything you don’t jive with or add an all-star ingredient I may have left out.

Ingredients

  • 1 lb cooked shrimp, peeled and deveined
  • 1/2-1 can corn, drained (or fresh or frozen)
  • 1/2-1 can black beans, rinsed and drained
  • 1 avocado, diced
  • 1/4 red onion, diced
  • 1 medium tomato, diced
  • 1 jalapeno, diced
  • juice of 2 limes
  • cilantro, chopped (to taste)
  • olive oil
  • salt and pepper

Instructions

Peel your shrimp (if they haven’t been) and chop into bite size pieces. Prepare all vegetables by dicing into similar sized chunks.

In a small bowl combine lime juice, onion, salt and pepper, and a drizzle of olive oil. Let sit for about 5 minutes to allow the juices to mellow out the flavor of the onion.

In a large mixing bowl combine corn, beans, avocado, tomato, jalapeño, shrimp, and cilantro. Add onion mixture and stir to coat. Add more oil or lime juice if needed. Season with salt and pepper to taste.

For best flavor, refrigerate for at least 30 mins. Serve with tortilla chips, over greens, or just by itself!

Homemade meatballs

Meatballs

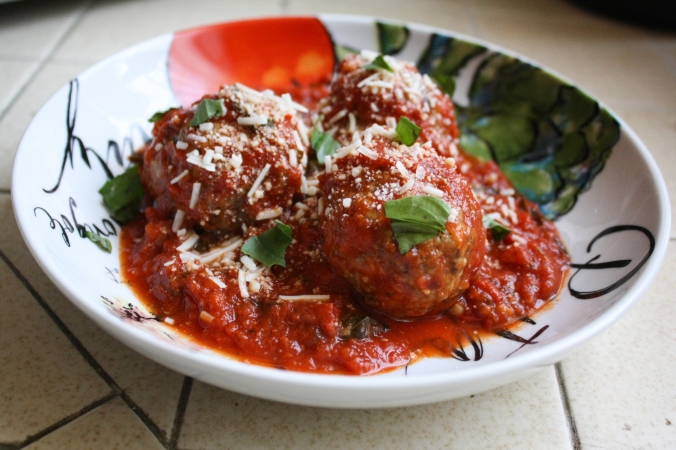
By now you should know I’m a pretty big fan of Italian(s)—food, people, culture—so it should come as no surprise that the guy I’m dating is Italian. When we first met I asked what his last meal on Earth would be, and he immediately responded with his dad’s meatballs. So (obviously) I got my hands on the recipe and here we are. You can thank Steven Constantino if you fall in love with these meatballs—and trust me, you will.

This was my second time making them, and I don’t know how they compare to Matt’s father’s, but I thought they were damn delicious. Matt kindly informed me they were a bit onion heavy, and to make sure to chop the onions into oblivion. The recipe calls for one small onion or half a large one, and I think I chose too big of a large one. The first time I made them, I remember him deliberately instructing me to chop all the ingredients into smithereens, so just make sure you finely, finely, finely dice everything to avoid one ingredient from masking the others.

For this batch of meatballs, I made the homemade marinara sauce recipe I stole from Carissa’s family (you see now why I keep Italians close—they always have the best family recipes). But the first time I made the meatballs, I used a jarred sauce called Rao’s that Matt swears by. It’s a little more expensive than the popular brands like Prego or Ragu, but it tastes homemade, so it’s definitely worth it.

We’ve used the meatballs to make subs, put them over pasta, and just eaten them by themselves in the sauce, with a little parmesan on top. I think Matt’s dad even uses them in his lasagna, which I’d love the recipe for—hint, hint! 

Enjoy.

Ingredients

  • 2 lbs ground chuck
  • 1 lb ground pork
  • 2 eggs
  • 1/2 cup milk
  • 1/4 cup olive oil
  • 3/4 cup romano cheese
  • 1 1/2 cups Italian bread crumbs
  • 2–4 cloves garlic, minced
  • 1 small  or half a large yellow onion, minced (very finely)
  • 1/2 cup fresh, flat leaf parsley, finely chopped
  • salt and pepper
  • sauce (3–4 24-oz jars or homemade marinara)
  • fresh basil, to garnish

Instructions

Make sauce if using homemade.

Finely mince the garlic, onion, and parsley. In a large mixing bowl combine all ingredients (except sauce) and mix well with hands.

Preheat oven to 300 degrees.

Shape mixture into medium-sized balls and place on a lined baking sheet sprayed with cooking spray. Bake in the oven for 3o minutes.

Warm the sauce and drop in balls to continue cooking until ready to serve. Garnish with fresh basil.

*Recipe makes 20-30 meatballs. Store leftovers in a Ziplock bag in the freezer.
**Ask your butcher to grind chuck for you if you can’t find it already ground.

Crock pot Korean beef with broccoli

Slow cooker Korean beef with broccoli

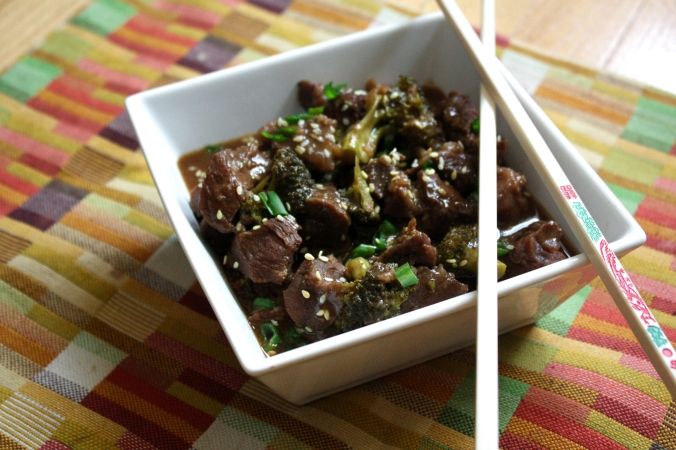
When my best friend moved back to Boston last year, she was nice enough to give me her crock pot. I don’t know how many times I’ve told myself I was going to make something in it, but never did. So last week I decided enough was enough—I was going to make something, dammit. I browsed Pinterest for the perfect recipe to pop my crock pot cherry (sorry, that sounds terrible) and came across a recipe for Korean beef. Yes please!

The great thing about crock pot recipes is—of course—the ability to set it and forget it. I started this dish when I woke up and it was ready by lunchtime (or dinner if you were to do the low heat setting). I actually suggest using the low and slow method because it will make the meat more tender. Because the chuck roast comes from a heavily exercised part of the cow (the shoulder), it can be very tough. However, cooking it at a lower temperature for a longer period of time allows the connective tissues (the part that makes them tough) to dissolve. SCIENCE!

Anyway, I had to go to work in the evening the day I made this, so I needed to speed things up. I will say that although the flavors were phenomenal, the meat was a bit tough. You live and you learn.

Another great thing about this dish is that it’s a lot healthier than your average takeout meal. Although it’s getting better, a lot of takeout dishes are loaded with sodium, MSG, and other unnatural preservatives. Making it at home allows you to control the amount of salt and the quality of ingredients you use. Aaaand I say this between bites of leftover Chinese takeout.

Do as I say, not as I do! 

Enjoy.

Ingredients

  • 3 lbs boneless beef chuck roast (or rump roast)
  • 2 heads of broccoli, cut into florets
  • 1 cup beef broth
  • 1/2 cup soy sauce (reduced sodium)
  • 1/2 cup brown sugar, packed
  • 1 tbsp sesame oil
  • 1 tbsp rice wine vinegar
  • 1 tsp Sriracha
  • 1 tbsp freshly ground grated ginger
  • 4 cloves of garlic, minced or grated
  • 1/2 tsp granulated onion
  • 1/2 tsp white pepper
  • 2 tbsp cornstarch + extra, if needed
  • sesame seeds (for garnish)
  • green onions (for garnish)

Instructions

Cut your roast into 1-inch cubes and place in the crock pot.

In a large bowl, whisk together beef broth, soy sauce, brown sugar, sesame oil, rice wine vinegar, Sriracha, ginger, garlic, granulated onion, and white pepper. Add to crock pot and mix with beef until well combined.

Cover and cook on low heat for 7-8 hours or high for 2.5-3 hours (again, I suggest the slower method for ultimate tenderness).

For the last half hour of cook time, cut broccoli into florets and put into crock pot. Whisk cornstarch with 1/4 cup water and mix into crock pot with beef and broccoli. Turn heat to high and continue to cook for half an hour or until sauce thickens. You can add more corn starch gradually if sauce is too thin.

Serve over rice, in tacos, or by itself and garnish with sesame seeds and chopped green onions.

Chili lime shrimp and veggie kebabs

Chili lime shrimp and veggie kebabs

The air is getting warmer, the sun is shining brighter, and the shorts are getting shorter—this can only mean one thing—summer is right around the corner! When I think about summer cuisine I think bright, fresh, and light. Herbs, citrus, and seafood are among my favorite summertime foods, and they pair so well together to create light, refreshing meals.

One of my best friends from high school, who’s now living in Vancouver (miss you!!), posted a photo of some grilled skewers she and her fiancé made last week, and it inspired me to make my own. I prefer using an outdoor grill for this to get a nice smoky flavor, but if you are like me and don’t have access to one, don’t fret—you can achieve the same effect using an indoor grill pan.

Chili and lime is a famous flavor combo, especially near the border. It pairs well with proteins such as chicken, seafood, and even nuts. I’ve been craving shrimp lately, so I opted for the seafood route with these kebabs. Another good alternative would be chicken or a nice, meaty fish such as halibut or tuna. I like to cook the meat on separate skewers than the vegetables to ensure a more even cook throughout. I also baked the veggies, rather than grilling them so I could cook them at the same time as the shrimp.

This meal is super light and healthy (and pretty!) making it perfect for summer. For a little more substance, serve kebabs with a side of rice perfumed with herbs like cilantro or parsley. MMMMMMMMMmmmmmmmm, I should’ve done that! Next time.

Enjoy.

Ingredients

  • 1 lb shrimp (peeled and deveined)
  • cherry tomatoes
  • bell peppers (any color)
  • red onion
  • zucchini (yellow/green)
  • cilantro (chopped)
  • chili powder
  • granulated garlic (or garlic powder)
  • Sriracha
  • Lime juice (2-3 limes + extra for garnish)
  • avocado oil (or canola, olive oil, etc)
  • salt and pepper

Instructions

Preheat oven to 400 degrees.

Peel shrimp if not already peeled and place in a large bowl. Combine juice of 2 small limes, oil, granulated garlic, chili powder, salt and pepper, cilantro, and Sriracha to coat shrimp. Let marinate in the fridge for half an hour.

Chop veggies (as many as you’d like) into bite-size chunks (keep cherry tomatoes whole) and toss in a bowl with juice of a lime, oil, chili powder, granulated garlic, Sriracha , and salt and pepper to taste.

Skewer the veggies onto a metal skewer (if using wood, make sure to soak in water beforehand) in any order you like. Place a cooling rack on top of a baking sheet lined in foil for easier clean up. Place the skewers on the rack and bake for 25-30 minutes.

Preheat your grill pan to med-high heat and spray with non-stick cooking spray. Skewer the shrimp. During the last 5-10 minutes of bake time for the vegetables, start grilling the shrimp. They only take a couple minutes on each side, so the shrimp and vegetables should get done at the same time.

Grill shrimp on one side for about 2 minutes, flip, and grill for another 1-2 minutes until shrimp are completely opaque. Make sure not to overcook the shrimp as they will get tough and rubbery.

Serve with lime wedges and chopped cilantro to garnish.

*This amount of shrimp makes approximately 3 skewers. 


Tuscan-style chicken drumsticks

tcd2
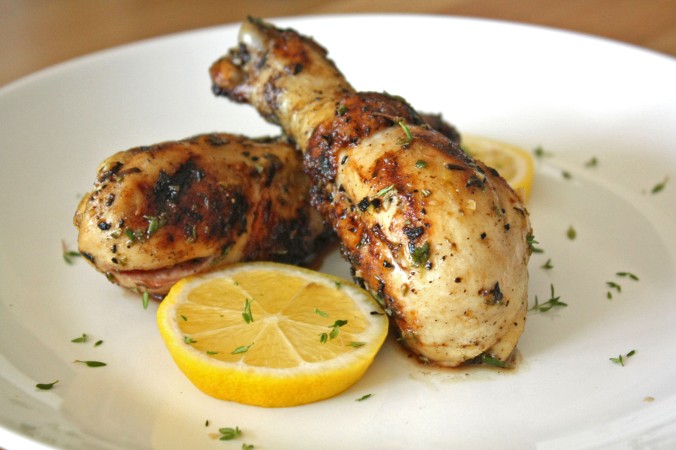
Living in California means I’ve been graced with the opportunity to grill outdoors all year long. Living in a studio apartment, however, with no patio and no grill, does not. But, this doesn’t mean I can’t enjoy all the wonderful, smoky flavors of an outdoor grill in my very own kitchen. The secret? A cast iron grill pan.

Cast iron is kind of a b**** to clean, especially the grill pan ones, but the char and flavor you get from it, is so worth it. If you don’t have cast iron, you can use any type of indoor grill you have, or better yet, an actual grill! These would also be great baked, you just won’t have the char marks or smoky flavor that you get from grilling.

As I mentioned in my Neapolitan pizza entry, I got to enjoy a full on Italian feast when I was in Boston visiting my friend, Carissa. In addition to the array of pizzas, her dad also whipped up some wings in his wood-fired oven that Carissa made a quick, Tuscan-style sauce to toss in. The sauce consisted of lemons, olive oil, garlic, and herbs. Simple, fresh, and bright—that’s what I love about Italian cooking. They don’t overcomplicate things by using too many ingredients or seasonings.

The combination of lemon, garlic, and herbs has become one of my favorite flavor profiles. The savory notes from the garlic and herbs marry so well with the acidity and brightness of the lemon. It makes a great marinade for seafood and poultry, but it’s also delicious over pasta. Shrimp scampi, anybody??

Alright, now that my mouth is watering, let’s get to the drummies!

Enjoy.

Ingredients

  • 8 chicken drumsticks
  • 1/2 cup olive oil
  • 1/4 cup fresh lemon juice
  • zest from one lemon
  • 1-3 garlic cloves, minced or grated
  • 2 tbsp fresh rosemary, chopped
  • 2 tbsp fresh parsley, chopped
  • red pepper flakes
  • salt and pepper

Instructions

Combine all ingredients (except chicken) in a mixing bowl to make the marinade. Set aside a couple tablespoons of marinade to toss chicken in after it’s cooked. Add chicken drumsticks and the rest of the marinade to a large ziplock bag and let sit for at least 30 minutes.

Heat a cast iron grill pan (or whatever pan you’re using) to med-high. If you’re using cast iron, you want it to start smoking before you put in your chicken.

Oh yeah.. It can get a little smoky, so you may want to open a window or turn on the vent (or disable the fire alarm). 

Remove chicken from the bag and reserve marinade for basting. Grill the drumsticks for a few minutes until grill marks form. Flip and repeat this process until all four sides have marks. Turn down the heat to med-low and continue flipping every few minutes or so, basting the chicken with the marinade as you go. Cook chicken until internal temp in the thickest part of the chicken (not touching the bone) reaches between 165-175° (about 25-30 minutes).

Take chicken off the grill and let rest for 5 minutes. Toss drumsticks with the marinade you saved in the beginning, right before serving.

*To avoid dried out chicken, I suggest taking it off the grill at 165°, as it will rise another 5 degrees or so when it rests. 

Turkey sausage and kale soup

kale soup_2

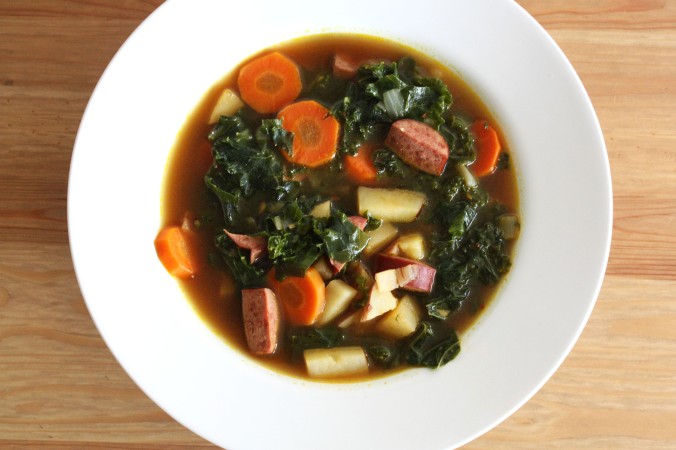
So, California weather finally decided to get with the times—it was 49 degrees when I woke up the other day. F o r t y-n i n e. For Californians, that’s like 10 degrees because we are pathetic creatures who wear knit hats when it’s 80 because, according to a calendar, it’s winter. Even though I may have complained a bit about goosebumps and the fact that I only got to use my new air conditioner for a week, I’m actually ecstatic about the temperature change. Cold weather = soup season = heart eyes emoji. Simple as that.

I came across this recipe one winter while I was living in Minneapolis and it’s been a go-to ever since. It’s super healthy, but still very satisfying and hearty with all the chunks of potatoes and sausage. I think that’s one of the constant struggles with eating healthy—trying to find something that fills you up (and tastes good), without breaking the calorie bank. And this soup does exactly that.

Another thing I love about soup in general, is how versatile the ingredients can be. I chose specific veggies for this one, but you can really interchange them with any you’d like (think: butternut squash, bell peppers, celery, beans, etc). As long as they’re  firm enough to hold up in the broth without breaking down (think: spinach) feel free to throw them in. And you can always use whatever sausage you like or have on hand. Chorizo or spicy Italian sausage would be awesome, I bet.

Enjoy.

Ingredients

  • 14 oz turkey sausage, partially cooked
  • 6-8 cups kale, chopped (approx)
  • 1 small onion, chopped
  • 1 large carrot, cut into slices
  • 3 garlic cloves, minced
  • 3 medium red potatoes, chopped
  • 8 cups chicken or vegetable broth (low or no sodium)
  • 2 cups water
  • olive oil
  • red pepper flakes
  • salt and pepper

Instructions

Start by chopping up all your veg. The soup should have nice, big chunks, so don’t dice them too finely. I left the skin on the potatoes, but feel free to peel them first if you’d like.

Heat a small amount olive oil in a large soup pot over med-low heat. Cut the sausage into thin slices and add it to the pot (if you’re using uncooked sausage, cook it whole and slice it later). Once brown, take sausage out of the pot and set aside.

Add a little more oil to the pot, along with the onions and carrots. Cook over medium heat until slightly soft and translucent. Add the garlic and cook for another minute.

Add the broth and water, along with the salt and pepper to taste. Bring to a boil and cook for 5 minutes. Add the potatoes, sausage, and red pepper flakes and bring to a simmer. Cover and cook for another 5 minutes. Add the kale and bring back to a simmer. Cook, partially covered for 5-10 minutes, until the potatoes are cooked through. Adjust seasonings.

My adventures with Neapolitan pizza pie

*Forewarning: this entry is long. If you’re just looking for the dough recipe, skip to the end. But you’re missing out on lots of laughs and fun. Bye. 

Lately I have been obsessed with pizza. But not just any pizza, I’m talking authentic, Neapolitan style pizza cooked in a wood fired oven at extremely high temps with a thin, chewy crust, topped with simple, rustic ingredients. This obsession came to head when I was visiting my best friend, Carissa, in Boston last month.  Her dad (Eddie Spaghetti), being the awesome Italian that he is, has a wood fired pizza oven in his backyard—cue praying hands emoji. So, you better believe I made Spaghetti whip me up a couple pies while I was there. Not only was it the best homemade za I’ve ever had, I also learned a lot about authentic, Italian cooking.

Of course, being on the East Coast also meant I had to try the local pizza, since LA pizza pales in comparison, according to every East Coaster, ever. Verdict? They’re right—kind of. The reason I say kind of is because I’ve come to realize that the east and west coast aren’t going for the same result when it comes to pizza, so it’s not really fair to compare the two. I discovered this when Carissa’s brother, Paula (his name is Paul, but I call him Paula because it’s cute) said that the West Coast tries to be “too fancy” with their pizza. The East Coast is good at keeping it classic with the basic, simple ingredients (think: cheese, pepperoni,  and basil) whereas the West Coast tries to elevate their za with exotic ingredients (think: truffles, goat cheese, and duck bacon).  So, if you ask me which one is better… I’d probably still say the East Coast, who am I kidding? But, I do have an appreciation for California’s creativity.

za collage 2 And so, taking all my newfound knowledge and experience with pizza making, I ventured to the kitchen to create my own (sort of) authentic, Neapolitan style pizzas with a California twist. I dragged my brother along with me cause God knows I couldn’t be trusted with measuring cups alone.

Story Time

My brother (Stephen) travels a lot for work, so when he’s home we take advantage of spending time together. For us, this usually consists of cooking and drinking, usually simultaneously. So last week I proposed the idea of getting together to make some homemade pizza. I told him all about the pizza Spaghetti made on my trip, and suggested we try out the dough recipe. He was all in. Since the dough takes two days to rise he asked if I wanted to make the dough by myself, I repeat by myself, and then bring it over to his place when we were ready to cook. I politely reminded him that I need adult supervision when it comes to measuring, and then politely forced him to help me.

So, cut to, we’re in my kitchen very diligently measuring out the all ingredients (there’s four ingredients in this recipe) when he gets a phone call and leaves the room. I decide to carry on with the measuring and before I know it, I’ve added two tablespoons of salt instead of two teaspoons. Oops. He looked away for five seconds and I’ve already ruined everything. When he comes back to the kitchen he simply picks out most of the salt with his fingers (genius) and we call it good.

Now that we’ve combined all the dry ingredients, it’s time to add the water and form the dough. Stephen pours the water in little by little while I mix it together with my hands. So far, so good. When we near the end of this process, Stephen thinks the dough looks too dry and suggests we add more water. I don’t really think it needs more water, but I enthusiastically agree anyway and we add the water. Oops numero deux. The dough turns into a sticky, hot mess. I’m a little worried at this point, but secretly happy I wasn’t the only one that made a mistake, today. We both decide that adding more flour seems like a legit solution, so we keep adding flour until we feel it looks right.

Next comes the fold and stretch. The recipe does not describe how exactly you’re supposed to “fold and stretch” the dough, so Stephen just decides to stretch the hell out of it at all angles and mangle it into a ball. I think I have a better idea of how to do this, so I try it out and Stephen agrees it’s more civilized, and we press on.

Alas, the dough is done. We wipe the sweat off our brows and high five each other in the form of downing a bottle of wine. We deserve it.

Pizza Time 

The recipe makes about four pizzas, so we both came up with a couple ideas for each pizza, all inspired by noteworthy zas we’ve encountered in the past. We split it up into four courses. I created courses one and two, Stephen did course three, and we both (along with Stephen’s girlfriend, Adriana) created the fourth course.

  • Course one: Margherita
  • Course two: Mushroom, truffle oil, and arugula
  • Course three: Roasted curry carrot with beets and shaved Brussels sprouts
  • Course four: Proscuitto, sage, and fig jam

Unfortunately none of us have a wood fired pizza oven, or a backyard for that matter, so we decided to grill the pizza instead of putting it in an oven (with the exception of course four).

Course one: Margherita

IMG_1166

Ingredients

bufala mozzarella
fresh basil
red sauce*

*whole, peeled San Marzano tomatoes, kosher salt, and oregano (blended). Do not warm, sauce cooks in the oven. 

Making this pizza was important to me because I wanted to make a truly authentic Neapolitan style pizza, like the one Spaghetti made for me in Boston. So, I called him up and he helped me out with the sauce and all the essentials.

IMG_1193I love this pizza because the ingredients are so simple, but the flavors are so vibrant. What I’ve learned about Italian cooking is that they like to keep things simple, fresh and rustic. They use good quality ingredients, and let them shine on their own.


Course two: Mushroom, truffle oil, and arugula 

IMG_1207

Ingredients

cremini mushrooms
goat cheese
arugula
truffle oil
olive oil

The inspiration for this pizza actually came from the restaurant I work at in Culver City, called the Overland. We recently added flatbread pizzas to our menu and my favorite one has mushrooms, arugula, and burrata cheese. I wanted to recreate that, but put my own spin on it.
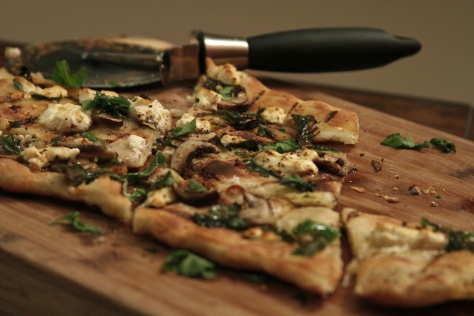
IMG_1228I added truffle oil and used goat cheese instead of burrata. I thought that the tanginess of the goat cheese would pair nicely with the peppery arugula and cut through the pungent, rich flavor of the truffle oil.
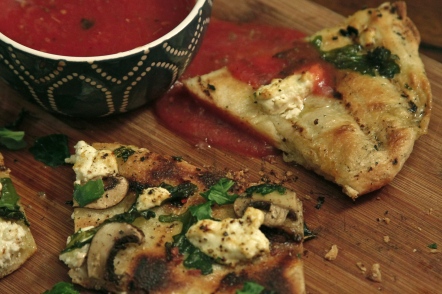
IMG_1257

Because we didn’t use a sauce for this one, we thought it came out a bit dry. If I were to make it again, I think I’d make a bechamel (white sauce) to put on it as well, which is actually what they do at my work. You win this time, Overland. Luckily, I had plenty of sauce left over from the Margherita, so we used it as a dipping sauce.

Course three: Roasted curry carrot with beets and shaved Brussels sprouts

IMG_1259

Ingredients

beets
shaved Brussels sprouts
toasted hazelnuts
goat cheese
carrot curry sauce*

*I have no idea what’s in this sauce, you’re gonna have to wing it or call my brother.

This pizza was designed by my brother after eating at one of his favorite places in New Orleans called, Domenica, which in Italian means, Sunday. It’s hilarious to me that he chose to make this one because it’s rare that he eats vegetarian pizza. He one time said and I quote, “I need meat. I’m not in the mood for a f***ing farmer’s delight,” when we were deciding which pizza to order. Yikes.
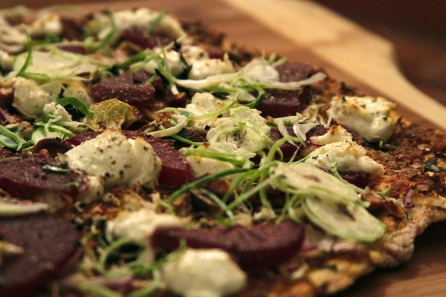
IMG_1261Anyway, I guess one of the locals at this place suggested the Roasted Carrot pizza and he was in the mood for a f***ing farmer’s delight that day. He said it was one of the best pizzas he’s ever had, so here we are. I don’t know what the pizza at Domenica tasted like, but if it was anything like this, I suggest you check it out if you’re ever in New Orleans.
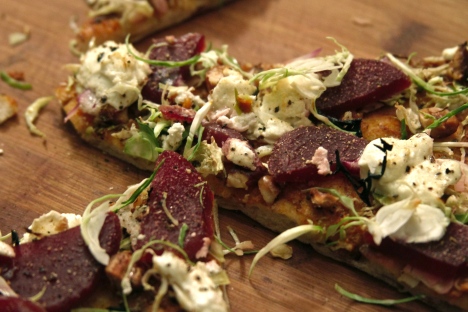
IMG_1280I’m a huge fan of the beets and goat cheese combo, so that made me happy right off the bat.  The nuttiness from the hazelnuts paired well with the curried carrots, and the crunch of the sprouts made it all come together. Not only was it tasty, but it was beautiful as well. I love how rustic and bright this pizza is.

We decided if there was one thing we would change, it would be to add some sort of cream element to the sauce to make it a bit more, well.. saucy. But I think that’s what makes cooking fun. People think they aren’t allowed to make mistakes, but that’s how we learn and become better cooks. Speaking of mistakes.

Course four: Proscuitto, sage, and fig jam

IMG_1292

Ingredients

proscuitto
fresh sage
mushroom brie
fig jam

This was sort of our “we have four pizzas, but only three ideas, what the hell should we put on the last one?” pizza. I decided proscuitto would be a good idea, and then my brother and Adriana came up the rest by running across different items at the grocery store. Now don’t get me wrong, all of these ingredients have the potential to make up a very yummy pie, but the failure came in our execution and maybe one too many glasses of wine.
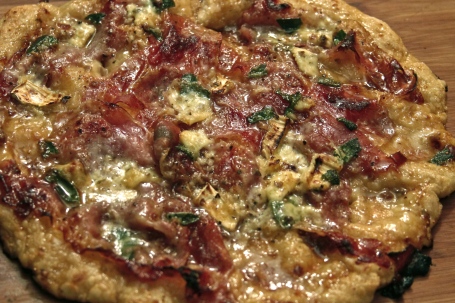
IMG_1294What I believe our thought process was, was to make it more of a dessert pizza since it was the final course. Smart. What we did to make this a dessert pizza, was simply douse it in copious amounts of fig jam. Not so smart. The end result was a much too sweet, sticky mess, that was kind of similar to eating a spoonful of jelly. We really just should have smeared some PB on it and called it a day.

However, this was the only pizza we made in the oven, and I thought it most resembled the way a Neapolitan style pizza cooks in a wood fired oven. So that was nice

My brother was so determined to not let the pizza go to waste, that he decided to repurpose it and make bread pudding. If you’re baffled as to how/why he did this, join the club. I’m sad to say I never tried the pudding, so I can’t tell you myself how it tasted, but I just talked to my brother and he said it’s still sitting in the fridge, untouched—it’s been a week. I’m making him try it, now. Stay tuned.

Waiting.

Waiting.

Okay, he just called with the verdict. His words, “Dude, this is f***ing bomb.” So there you have it, folks. If at first you don’t succeed, make that shit into bread pudding. #wordsofwisdom

And, finally, here’s the recipe for Neapolitan style pizza dough (2 day method). Enjoy.

Ingredients

  • 5 cups Italian “00” flour (you can find this at Whole Foods)
  • 2 tsp kosher salt
  • 1 tsp instant yeast
  • 14 oz room temperature water

Instructions

Add all dry ingredients to large mixing bowl and stir. Add water and mix for about 2 minutes. I used my hands, but you could use a Kitchenaid mixer if you have one.

Let the dough rest for 5 minutes, and then mix for another 2 minutes.

Take the dough out of the bowl and stretch and fold dough into a ball. I’m not 100% sure on the correct way to do this, but I just kind of stretched it apart and then folded it under, tucking it into a ball shape. Cover the dough with a bowl and let rest for 5 minutes.

Perform three more stretch and folds every 5 minutes. Transfer the dough to a bowl big enough for it to double in size. Cover the bowl and place in the refrigerator for 24 hours.

The recipe says to take the dough out and divide it into 4 sections and form into balls at this point, but I just left it in the fridge for the additional 24 hours and cut it up into balls when I was ready to make the pizzas.

When you are ready to make the pizza, take the balls out of the fridge and bring them up to room temp. Flour a large, flat surface, such as a counter top, and begin forming the pizza. I just gently stretched the dough apart using my hands until I formed a shape/thickness I liked. You want it to be thin, but not so thin that it will fall apart when you put your toppings on. Transfer the dough to a pizza paddle or something that’s easily transferable to your cooking source. Top the pizza with any ingredients you like. Feel free to try out some of mine, above.

To bake the pizza

If you’re using an oven:

Preheat your oven to the highest temperature it will go for 45 minutes with a pizza stone in the oven (you can use a cookie sheet if you don’t have a pizza stone).  Put the pizza on the stone and bake until edges are charred and the dough and toppings are cooked through.

If you’re using a grill:

Oil the grill (not with spray) to prevent the dough from sticking. Briefly cook the dough on both sides creating grill marks before adding the toppings. Take off the grill to add all the fixings and then transfer the pizza back on the grill until toppings are to your desired doneness.

*These methods were an experiment for us, so you may find a method that is easier or works better for you. Be creative. Best of luck. 

A BIG THANK YOU TO MY BROTHER FOR TAKING ALL THE BEAUTIFUL PHOTOS!!
Paprika chicken in a white wine butter thyme sauce

Paprika chicken

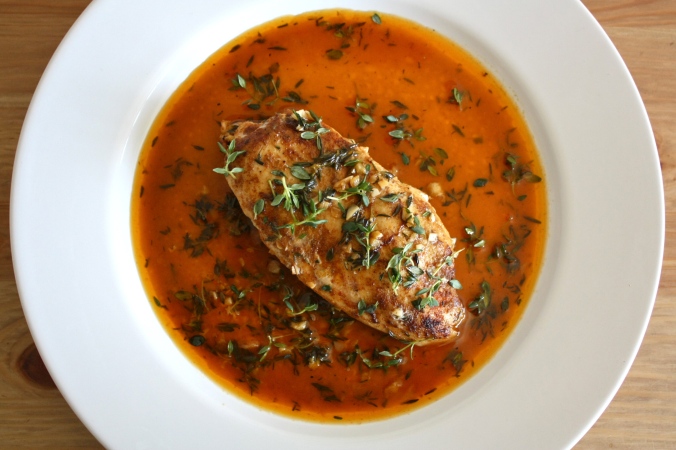
I’m sure ya’ll hate the saying “winner winner, chicken dinner” as much as I do (except you, Guy Fieri), but this dish is seriously a winner chicken dinner. It’s elegant, rich, and savory. Not to mention, beautiful. When I made this, I felt like I was on a date with myself. So, for any of you who actually have dates, please make this for them. If they don’t love you already, they will. Maybe. Don’t hold me to that, actually.

Paprika chicken with brown rice copy
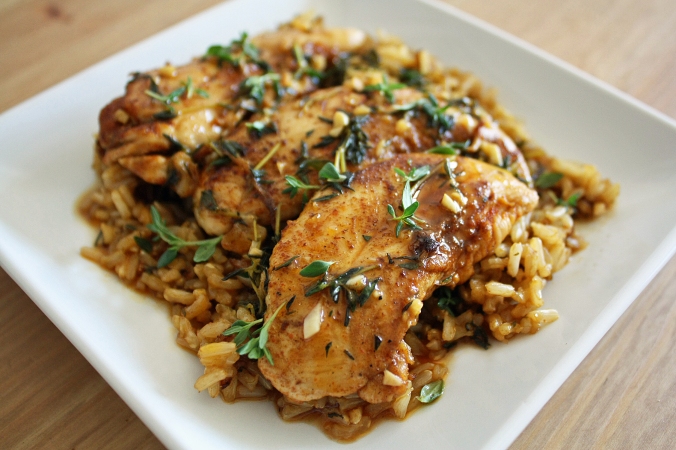
I paired mine with brown rice, which soaked up all the rich, buttery sauce, hiding any evidence of its health benefits. But you could skip the rice and just drink the sauce after you’re done with the chicken if you want. In which case, we should get married because I love you.

Enjoy.

Ingredients

  • 2 chicken breasts
  • 2-3 garlic cloves
  • 1/4 cup fresh thyme
  • 5 tbsp butter
  • 1 cup dry white wine
  • paprika
  • cayenne
  • salt and pepper

Instructions

Rub chicken breasts with paprika, cayenne, salt, and pepper. Finely chop the garlic and remove the thyme from the stems.

Heat a cast iron pan over medium heat and melt 3 tbsp of butter. Add the chicken and cook til a golden brown crust forms. Flip the chicken and continue cooking for a few minutes. Add the remainder of the butter, garlic, and thyme and stir until softened.

Add the wine and reduce heat to med-low. Cook until the wine has reduced to a sauce and the chicken is cooked through. You may need to flip the chicken a few times throughout. Serve over any grain of your choice and garnish with a little fresh thyme.

*This recipe makes about 2 servings.